Monday, November 27, 2017

FINALLY GETTING FULLY INTO THE 3D PRINTING TERRAIN MOVEMENT.


Over the last few years 3D printed terrain has become more common place. I was first introduced by the concept by some wargamers from NYC at the 2013 Games Day in Memphis. After seeing what can be done with this technology, I got my own 3D Printer in December 2014. Since then there has been multiple Kickstarters presenting amazing STL design files. (STL is a file format native to the stereolithography CAD software created by 3D Systems, this is the most common file type for printing 3D models) Once you have these files, you can print your own terrain for your gaming table. The awesome thing is, once you have a t STL file of s model you are able to print it out as many times as you desire. Recently business have popped up online that sells the STL files or completed printed out models ready to paint and put to use.

 Get yourself this highly rated 3D printer

A new tool/toy is coming to my studio. This will be the begginig of a wargaming terrain 3D printing farm adding to my venerable 2014 Printrbot Metal Plus. Stay tuned for upcoming model prints, designs, ideas and lots of time in the airbrush booth.

Friday, September 16, 2016

Hands Free Hair Dryer for Your Miniature Painting Convenience and Glazing Pleasure


I like how a hair dryer speeds up the painting process by drying your current work, so you can move on to the next painting technique faster. This is especially nice while glazing layers. If you ever tried to glaze over a not so dry area and had the lower layer basically tear, you know what I am talking about and the frustration. I know picking your hair dryer and quickly holding it over your work is not so bad, but just tapping your toe and placing your model in front a dryer make painting a little more enjoyable.

The parts for this easy project are simple:

1) A hair dryer (Please  measure the plug

2) 60 inches of 2 inch PVC pipe (Measure you power plug of your dryer to make sure it's size will able to feed through the PVC pipe.)

3) Three 3 way 2 inch PVC connectors

4)  Four PVC 2 inch end caps

5) 1 Foot Switch. Click link to purchase on Amazon.
Lighted Foot Switch with 9 Ft cord


1) I cut the PVC with a basic miter box and saw kit I have:

a) Cut the PVC pipe in two pieces 36 and 24 inches.
b) Cut the 24 inch piece into 6 eaual 4 inch pieces. This is for the bottom supports.
c) Remeber not to put it together, tightly, until you have got you hair dryer plug fed through the power plug to the end of one of the feet. I did this and had to take rubber malet to it get apart again.

2) Cut a notch in the 4 inch lengyth PVC to have enough room to have the wire feed through the foot.

a) Put the PVC cap on lightly so you can easilky take it off again. Mark an area about 1/4 inch wide by 1/2 inch deeper than were the cap stops.
b) Use a hobby saw and cut to the bottom of the retangle you just drew.
c) I snapped the the tab left after using the saw, them used a rotary tool to clean any remaining PVC.
d) Finished and cleaned the cut with a sanding stick


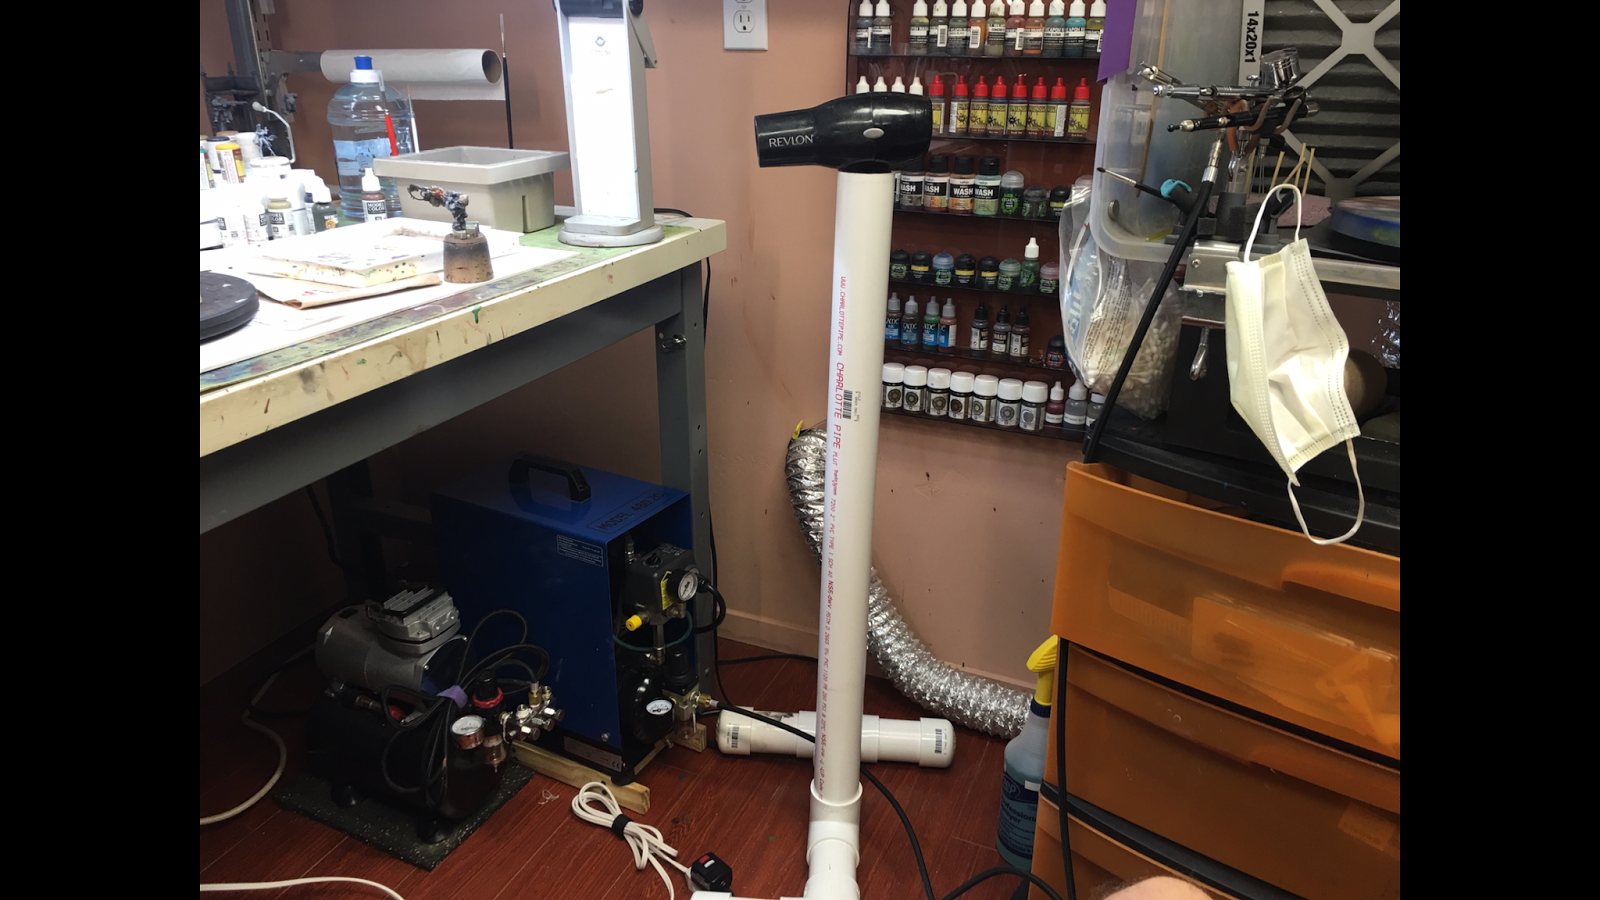
I still have not figured out if I am going to, if all, glue the PVC together. I want to be able to swing down the dryer closer to my work area to able to put a miniature in front the dryer, hands free, while I am working on something else.


It is so nice to tap your toe on a switch a quickly dry the miniature and be ready to move on. While the mini is drying you can be cleaning your brush getting ready for the next glaze layer.


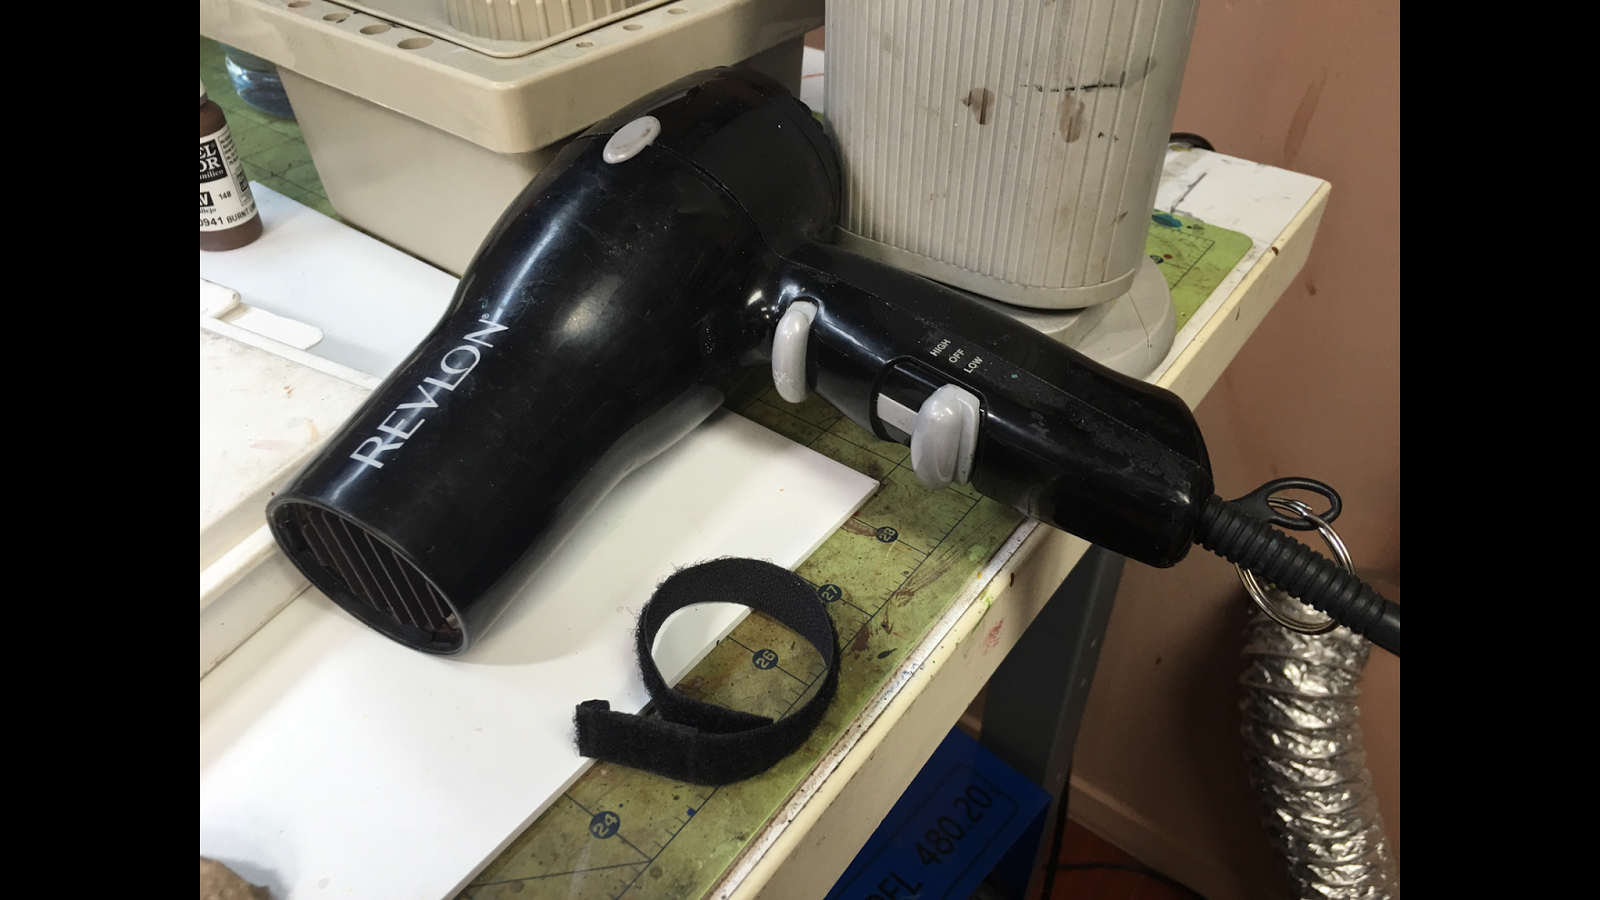
Below you can see I left enough slack in the power cord to be able to ajust the settings and have the capability to use the hair dryer extended from the base.


If I ever want to use the non heated setting I am using a velcro wire tie/power cord organizer to be able to hold down the non heat button. (Amazon Link to Buy)


Here is a photo with the Velcro strap in use. The velcro ties are great to have around in numbers, there are many uses for them.


I hope some find this a useful inexpensive contraption to make miniature painting a litttle more productive. It is nice not having to grab my dryer from the hook on my work station above the blue compressor or having it in my lap during a painting session. You easily modfiy this, drye holder, by changing the length of the main tube. You can also buy a PVC exrender, to lengthen the main pipe, if you paint on work surfaces at different heights.


Friday, May 22, 2015

My Silentaire Compressors

My Badger Millionaire compressor I bought $130.00 on EBay went down. It is a repackaged Slientaire 20A, that sells for$650.00 to $820.00.

I contacted Silentaire and was helped immediately. It turns out the auto shut off switch went bad and $100.00 for the part and said they will help me over the phone if I have any trouble.
So, I am still only in for $230.00 bucks; not too bad for a compressor that is as loud as an aquarium pump.

 In the mean time I checked Craig's List for fun and found an Slientaire 480.20 for $199.00. It did not see it on Silentaire's site, so called them to ask about it. It turns out to be an older version of the DR-150 that sells from $750 to $940, so I check it out and grabbed it.


Knowing what to look for, it was in new condition with only a few blemishes on the case the oil looked brand new and it works like a champ. The point of my post is, I see these type of compressors for sale from time to time and if you can pick one up cheap I highly recommend them. Changing the oil once or twice a year is a 20 minute process and you can not beat the only 30-40 decibels of sound they put out. Also, if you can pick it personally, I would recommend that. I believe my first compressor got banged up in transit. I will be putting up a video on the Richter Scale Studios' YouTube channel.


Thursday, January 1, 2015

Boom Microphone Stand Converted to a Camcorder Stand for Hobby and Tutorial Videos.

If you do hobby videos or tutorials, you know how hard it is to get a great camera angle to show the work you are trying to demonstrate. We all had those time where we are struggling to even work around the camera, where you have a great angle, but your work suffers from the awkward set up.

 Watching other YouTube channels I finally got an idea on how to rig something up that was not too expensive and relatively easy to get the parts and put together. With the advent of the Go Pro and other action cameras, there so many great choices for camera mounts especially for handle bars. So that is why I mounted it on a boom microphone stand. The boom micro phone stand it tall enough when you are siting to view directly above you and your work.  Here is a video and a couple photos on how I rigged my new camcorder stand.


Hear are the links for the equipment I purchased on Amazon.
Click on the Pictures:


This is a photo where I eventually added a small length of threaded 3/4 inch PVC pipe with a couple caps to give the microphone holder more rigidity, for the tripod mount to hold on to, and a more finished appearance. 


The complete set up over a dining room table to give you a better perspective on how it looks and works. The microphone stand adjusts up and down.


 The boom extends and retracts on the top of the stand and you also adjust the angle here.


Thank you for checking out my blog.


"Richter Scale Studios is a participant in the Amazon Services LLC Associates Program, an affiliate advertising program designed to provide a means for sites to earn advertising fees by advertising and linking to Amazon.com."

Tuesday, December 16, 2014

Thank you for checking out my blog. Here is a short video to give you some idea of what I do.


Here are some links to my other social media outlets and channels.


 MY CMON PAGE